
A few years ago I dropped my Roland Micro Cube guitar amplifier and ripped the speaker cone. As a result, it would make terrible farty noises if played above a certain volume. Last week I replaced the speaker - here are the steps I followed.
Tools needed: a screwdriver, a phone, and a credit card. No soldering iron required.
-
Call Roland Customer Support and ask for a replacement Micro Cube speaker, model number W120FP70-00C. It costs about $30 with tax and shipping. Mine arrived after about two weeks.
-
When you have the new speaker, set the Micro Cube down with its grill facing up. Unscrew the grill, then unscrew the old speaker from the mount.
-
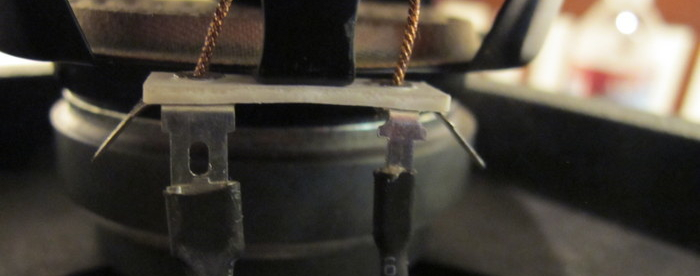
Gently remove the old speaker from the mount, so its connectors are visible.
-
Pull the connectors out of the old speaker - they’ll slide off with a little force, as shown in the above photo - and connect them to the new speaker. The connectors are different sizes, so don’t worry about connecting them incorrectly.
-
Mount the new speaker and reattach the front grill.
-
Plug in your guitar and rock out.
This is the most straightforward method I’ve seen to replace a Micro Cube’s speaker. If you want to try a non-Roland speaker, there are tutorials for that online too. Happy jamming!
I’ve used jQuery since I began my web development career, but I sometimes feel like it makes life too easy. In the spirit of rejecting complacency, I wrote a simple JavaScript image slider without jQuery or other libraries.
You can find a demonstration of the image slider here, and the Github repo is here.
It was illuminating to see how much I take jQuery for granted. For example, I wanted to add a button to the page. jQuery makes this very easy:
Without jQuery, however, you have to be a little more verbose:
I wanted to add a wrapper element to my group of <img> tags. This is a breeze with jQuery:
Without jQuery, you have to flex your JavaScript muscles:
I looked at jQuery’s source code after I finished the exercise to see how $.wrapAll was implemented, and unsurprisingly their implementation is very elegant. I think the average web developer can learn a lot from reading the jQuery source; for an excellent introduction, check out this screencast by Paul Irish.
This proved to be a fun and educational task, and it renewed my appreciation for jQuery’s simplicity and effectiveness. If you want to better understand the gifts jQuery gives you, I strongly recommend you try a little project without it.
Getting a new Mac is a lot of fun, but it can be tedious to install all your favourite software packages, especially if you’re a developer who uses lots of them. There’s something to be said for keeping a list of URLs to your usual tools, so that you can set up a development environment faster. Also, who knows - perhaps it would be fun in the future to look back at your toolset and reminisce.
Without further ado, here is the software I’ve installed on my work-issued MacBook Pro:
The Basics
Homebrew Packages
Assorted Productivity
Web Browsers
(I hardly use the non-Chrome browsers now that Web Inspector is so good, but you’ve gotta keep them around.)
Miscellaneous Steps
That’s pretty much everything. I’m sure that in a few years this list will look incredibly outdated, but right now, these are my favourite utilities with which to make websites. Thanks for reading!
A few months ago, I stopped using TextMate as my primary code editor in favour of Vim (specifically, MacVim). I first encountered Vim as a Linux-curious high-schooler, and had been averse to it ever since. The requirement to press i before inserting text seemed ludicrous to me. To navigate with hjkl instead of the arrow keys was like a masochistic exercise in self-deprivation. Like most of my generation, I learned the Microsoft Word/Notepad style of text editing, which is totally incompatible with how one uses Vim. On the rare occasion that I felt brave enough to use Vim, I’d make lots of mistakes, and I’d usually give up and use nano instead.

But in 2011, there was a tide of positivity about Vim, and I couldn’t ignore it. It was Vim’s 20th birthday, and there were lots of articles online about how productive it made its users and how rewarding it was to learn. My friends George and Nick would tweet about how they’d tweak their Vim setups for maximum efficacy, and my geek pride was dented somewhat by my inability to take part in their discussion. I watched people code in Vim, and not only had they overcome the learning curve, they were moving with incredible speed. The biggest factor for me, though, was that TextMate seemed to be stuck in a rut. There hadn’t been any major changes or improvements to it, and there was no indication of when TextMate 2 would come out (of course, TextMate 2 Alpha was released in December, but by then I had already switched to Vim). The time seemed right to give Vim another chance.
The switch
As expected, my first couple days in Vim were not hugely successful. It’s difficult to unlearn years of editing text the “usual” way. The most important insight I’ve had since I switched is that I spend most of my time as a coder editing code, not inserting code. Viewed in this light, Vim’s distinction between insert mode and normal mode makes lots of sense. Vim’s major advantage over other editors is the speed with which I can move around and manipulate code, even if I’m no faster at inserting new code. If you’re starting out, I’d recommend you get comfortable with b, e, and w first, as well as the hjkl home keys. Once you’re moving around without having to think about your keypresses, start referring to the cheatsheets at the bottom of this page. You’ll be a Vim guru in no time!
Resources
If you’re curious about Vim, there is a wealth of resources that’ll get you started. I use Janus, a distribution of common plugins that provide many of the comforts of TextMate. Not everybody thinks Janus is a good idea, but I like it and am sticking with it for now. It’s worth printing out a couple cheatsheets: this one and this one are my favourites. This post about Vim Text Objects is a goldmine of information. One of the most inspirational articles I read was Staying the hell out of insert mode, which really emphasized for me how great normal mode is and has done a lot to inform my overall philosophy on Vim.
If you’re curious to see how my Vim is setup, my personal dotfiles can be found on my GitHub.
In conclusion
I think switching to Vim is one of the best development decisions I’ve made recently. It enables me to work much faster than I could previously, and I’m proud that I can edit files in the terminal without resorting to lesser editors. If you’re curious about Vim, I’d strongly recommend trying it out. It’s definitely a little painful at first, but you’ll be surprised at how much more effective you become.

On November 3rd I attended the Red Dirt JS conference in Oklahoma City, where I gave a presentation about the Underscore.js library. I was nervous that my talk might not be very novel - most JavaScript developers I know are already big fans of Underscore - but it turned out that most attendees had never used it. If just one attendee ends up less frustrated with JavaScript collections as a result of my talk, I’ll consider myself successful!
The other talks were great. To name a few, Nathan Smith gave a very entertaining history of the Web thus far, fellow Waco resident Derick Bailey presented on Backbone, and JD Dalton introduced Benchmark.js. Brandon Satrom’s talk on CoffeeScript was exceptionally interesting, even with it being prerecorded - I hope in the future I’ll get to hear him in person.
My slide deck is online here. This was my first ever conference presentation, so I’m very grateful to the organizers for giving me the opportunity and the audience for being so gracious with their attention. Looking forward to next time!
As of 29 August 2011, I’ve migrated my blog from a self-hosted WordPress installation to (at the time of writing) 35 static HTML files hosted on Amazon S3. These HTML files are generated on my computer by Jekyll and uploaded using Transmit, in which I press a button and all my posts are synchronized to the cloud.
This is much lower-tech than a blog on a content management system, and wouldn’t work for most people. Indeed, the first time I heard about Jekyll I dismissed it as being too basic. After all, why would I forgo all the features of a CMS for the sake of some boring HTML files?
I decided to make the switch two weeks ago. I was struggling to write a post about Google App Engine’s free tier when I realized that WordPress’s bulk was slowing me down. I don’t need plugins, or TinyMCE, or multiple users, or post types: I just want to write about technical things that I think are interesting. I’d recently decided that I wanted to write in Markdown, which Jekyll enables by default. I found the official migration documentation, noticed that migrating to Jekyll looked very straightforward, and started building my new blog.
I found moving from WordPress to Jekyll very easy. I followed this migration guide and imported all my old posts into Markdown, which after you learn the format is much better for blogging than HTML. I wrote a new theme using the Liquid templating language (there are many example themes you can crib from here), and styled it primarily from the Twitter Bootstrap CSS framework. I put the site on S3 by following Amazon’s guide, and the payoff was immediate: as you can see below, the site’s response time has more than halved.

I’m really glad I’ve switched my blog to Jekyll. There’s less code to maintain, greater flexibility, fewer distractions, and now that my setup is simpler, I feel like my writing has improved. I’d recommend Jekyll to any technical blogger who’s tired of their bloated CMS and who wants to write more efficiently and enjoyably.
Update: Just my luck - I write 99% of a blog post about how I got around the limitations of Google App Engine’s free tier, and then I get an email announcing how Google will drastically change their price structure not in my favour. Looks like I’m not done trying to outsmart Google’s billing department…
Google App Engine’s free tier is great for small apps, but as I discovered when Twitty City reached a gigabyte of storage, its limitations can be extremely frustrating.
Twitty City ran well for its first few months, but after 400,000 tweets its datastore was full and needed to be cleaned up. Unlike the typical MySQL/PHP setup, GAE does not give the user the ability to delete from the datastore with SQL commands: data must be obtained programmatically. The only way to delete several rows is to select them in your program’s code, iterate over them, and delete them individually. This would be tolerable, except for three factors:
- It’s not possible to delete more than 1000 rows at once.
- Deleting rows is very CPU intensive: to delete 1000 rows at once consumes two minutes of the 6.5 CPU hours a free app is allowed in a day.
- There is no programatic way to see how much of your CPU quota remains, so you can’t automate a deletion task without the risk of depleting your CPU.
I reasoned that, if deleting 1000 rows used two minutes of my daily 6.5 CPU hours, I could run my ‘TidyUpHandler’ every eight minutes and not take my app offine. After many hours of gradual purging, the stale data was cleared and Twitty City was brought within disk and CPU quota. The TidyUpHandler still runs every eight minutes, and as a result storage is now stable at around 12% of capacity.
If you aren’t constantly maintaining your data, GAE is quite unforgiving. A gigabyte of free storage is unparalleled in web app hosting, but if your app’s datastore grows quickly by itself you need to take measures to ensure it won’t get out of hand, and you need to do so before you’re near quota.
(Or, you could just pay for extra storage/CPU, but where’s the fun in that?)

The Google +1 button hit the web earlier today, and I couldn’t resist the opportunity to put it on WordPress. Follow these steps and you can enable Google +1 on WordPress’s default TwentyTen theme:
-
First we need to add the relevant JavaScript to the theme’s header file (by default at /wp-content/themes/twentyten/header.php). Just before the closing </head> tag, add the following:
-
We then need to adjust loop-single.php so that individual posts will have the +1 button on them. Immediately after the <h1 class=’entry-title’> line (likely on line 26), add the following:
-
Finally, add the following to loop.php immediately after the final <h1 class=’entry-title’> (likely on line 132), so that posts on the homepage will have +1 buttons:
And that’s it! Now you’re ready to make good on the Internet’s latest e-validation button.

One of our clients needs to send emails with UTF-8 subject lines. Swift Mailer, which Symfony uses, makes this easy to do, but writing functional tests for it is another story. The problem is that, if non-ASCII characters are present in the subject line, Swift Mailer encodes them as required by RFC 2047 for example, a string like “Transformación” turns into “=?utf-8?Q?Transformaci=C3=B3n?=”. How do we know that this is the right subject line?
There’s no immediately-available “convert this into a RFC 2047-compliant subject line” function, but we can get around this by making use of Swift_Message->toString and some choice preg functions.
First, create a dummy message containing the appropriate header. Swift_Message->toString() will contain our encoded header:
Next, we have to extract our encoded header I’ve used preg_match() and a fairly simple regex.
Finally, now that the encoded header has been extracted, we need only wrap it in preg_quote() (because checkHeader() uses regex syntax) and test away.
Voila - now we can be confident that our test script can deal with Unicode email subjects. If you can think of a way to make this simpler, or more robust, let me know in the comments.
Update: As of October 2011 JamBox has been ported to use Socket.IO and is hosted on Heroku, which does not presently support WebSockets. The information in this blog post is therefore (mostly) out of date - the God process is no longer around, and JamBox now works in most major browsers.

My day job making content-managed websites is fun, and it pays the bills, but sometimes it’s nice to do something a little unconventional. So, I was thrilled when we had a “dev day” to write apps of our choosing in any language we wanted. Inspired by Jeff Kreeftmeijer’s node.js demo site (which shows every other visitor’s cursors in realtime) and Ron Winter’s Flash drum kit, I set about making a supercharged collaborative drumkit: JamBox.
JamBox’s premise is simple - each time you press a key, a sound plays, and everybody else on JamBox hears it. There are drum sounds, an extremely cheesy lead synth, a chunky slap bass, and various percussion noises (cowbell, bongos, DJ scratches, a dog woofing), so multiple users can play together and coordinate an actual jam session.
First, I wrote a single-user JavaScript drumkit - each sound is preloaded in the browser, and the keystroke listeners are bound. I then drew from Mr. Kreeftmeijer’s sample code to write the multi-user functionality. Crucially, I had plenty of time at the end of the hackday to spend in front of my favourite music-making tools, picking the right instruments and sampling them to perfection.
A downside is that JamBox relies on WebSockets, which aren’t supported by many browsers - not to mention, only a few browsers support .mp3 playback. As a result, JamBox has an “only works in Chrome/Safari” warning. Eventually I’d like to rewrite it to use the non WebSocket-specific socket.io library, and to switch between using .ogg/.mp3 files depending on the browser’s capabilities.
Another challenge was posed by the JamBox process’s tendency to stop running. Thanks to some sample code (again from Jeff Kreeftmeijer) I configured a God process to restart JamBox whenever it crashes.
All in all, I’m very pleased with the JamBox experience. I had a lot of fun making it, and even more fun making phat beats with it. Many thanks to White October for letting me build JamBox on company time, Jeff Kreeftmeijer for providing inspiration and generous sample code, and to my coworkers for helping me test and showing their musical talents.